Blood Pressure Sensor - Serial output
Reads blood pressure and heart rate and outputs at 9600 baud rate


Downloads
Terminal-PCBlood Pressure & Pulse reading are shown on display with serial out for external projects of embedded circuit processing and display. Shows Systolic, Diastolic and Pulse Readings. Compact design fits over your wrist like a watch. Easy to use wrist style eliminates pumping.
Features
- Intelligent automatic compression and decompression
- Easy to operate, switching button to start measuring
- 60 store groups memory measurements
- Can read single or all measures
- 3 minutes automatic power saving device
- Intelligent device debugging, automatic power to detect
- Local tests for : wrist circumference as 135-195mm
- Large-scale digital liquid crystal display screen, Easy to Read Dsplay
- Fully Automatic, Clinical Accuracy, High-accuracy
- Power by External +5V DC
- Serial output data for external circuit processing or display.
Specification
- Working Voltage: +5V, 200mA regulated
- Output Format :Serial Data at 9600 baud rate(8 bits data, No parity, 1 stop bits). Outputs three parameters in ASCII.
- Sensing unit wire length is 2 meters
Sensor Pinouts
- TX-OUT = Transmit output. Output serial data of 3V logic level, Usually connected to RXD pin of microcontrollers/RS232/USB-UART.
- +5V = Regulated 5V supply input.
- GND = Board Common Ground
Note: Product does not require battery for operation. It is powered from external PCB as per above pinouts.
Blood Pressure Basics
Blood pressure is the pressure of the blood in the arteries as it is pumped around the body by the heart. When your heart beats, it contracts and pushes blood through the arteries to the rest of your body. This force creates pressure on the arteries. Blood pressure is recorded as two numbers— the systolic pressure (as the heart beats) over the diastolic pressure (as the heart relaxes between beats). The unit which measures this is called Sphygmomanometer.
Monitoring blood pressure at home is important for many people, especially if you have high blood pressure. Blood pressure does not stay the same all the time. It changes to meet your body’s needs. It is affected by various factors including body position, breathing or emotional state, exercise and sleep. It is best to measure blood pressure when you are relaxed and sitting or lying down.
Classification of blood pressure for adults (18 years and older)
| Systolic (mm Hg) | Diastolic (mm Hg) | |
| Hypotension | < 90 | < 60 |
| Desired | 90–119 | 60–79 |
| Prehypertension | 120–139 | 80–89 |
| Stage 1 Hypertension | 140–159 | 90–99 |
| Stage 2 Hypertension | 160–179 | 100–109 |
| Hypertensive Crisis | ≥ 180 | ≥ 110 |
High blood pressure (hypertension) can lead to serious problems like heart attack, stroke or kidney disease. High blood pressure usually does not have any symptoms, so you need to have your blood pressure checked regularly.

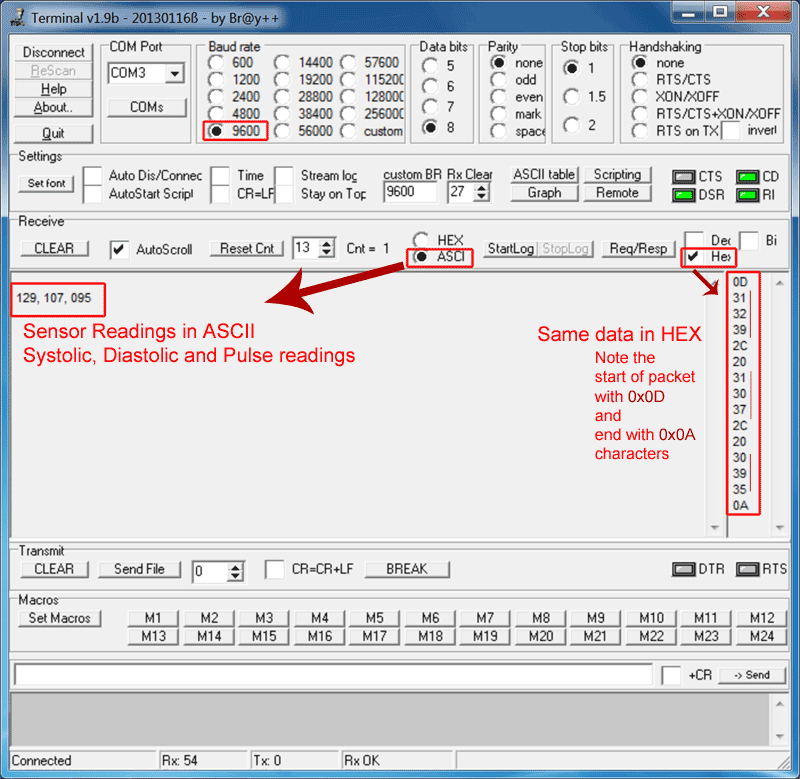
Output Readings
Following are example output readings from sensor. Each reading consist of 15 bytes at 9600 baud rate. The reading packet's last byte is always enter key character(0x0A in hex and 10 in decimal) so you can view each reading on new line. Also this character can be used to sync in microcontrollers after reach readings.
The output reading is 8bit value in ASCII format fixed digits, from 000 to 255.
Typical reading will be like below where the three values seperated by comma and space.
- Systolic
- Diastolic
- Pulse
129, 107, 095
We have used Terminal software to view reading, You can use any other software also which allows connecting to COM port and view/process data.
MCU Interfacing
It’s very easy to interface with microcontroller having UART. Configure your microcontroller to communicate at 9600 baud rate. Start reading incoming ASCII data. You can use this ASCII data to display on seven segment, LCD or convert to integer and do calculations as per project requirement. If you need integer values, you convert ASCII packet to Integer. In our sample code below, we have converted this ASCII value to interger.

Sample source code for 8051 type MCU, since its in C, it can be easily adapted to any other target devices.
// Compiler: Keil, Processor any 8051 core
#include <REGX51.H> // standard 8051 defines
// -=-=-=-=-=-=-=-=-=-=-=-=-=-=-=-=-=-=-=-=-=
// -=-=-=-=- Hardware Defines -=-=-=-=-=-=-=
// -=-=-=-=-=-=-=-=-=-=-=-=-=-=-=-=-=-=-=-=-=

char sbuffer[30], ch;
unsigned char pos;
unsigned char read1, read2, read3;

//receive serial character from serial port
char mygetchar(void)
{
	char c;
	while(!RI);
	RI =0;
	c = SBUF;
	return SBUF;
}

// -=-=-=-=-=-=-=-=-=-=-=-=-=-=-=-=-=-=-=-=-=
// -=-=-=-=- Main Program -=-=-=-=-=-=-=
// -=-=-=-=-=-=-=-=-=-=-=-=-=-=-=-=-=-=-=-=-=
void main()
{
	// -=-=- Intialize variables -=-=-=
	pos = 0;

	// -=-=- Intialise Serial Port -=-=-=
	//Sets up MCU to use 9600 bps @ 11.059 MHz Crystal
	SCON = 0x52; // 8-bit UART mode
	TMOD = 0x20; // timer 1 mode 2 auto reload
	TH1= 0xfd; // 9600 8-n-1
	TR1 = 1; // run timer1

	// -=-=- Program Loop -=-=-=
	while(1)
	{
				ch = mygetchar(); //loop till character received
				if(ch==0x0A) // if received character is <LF>, 0x0A, 10 then process buffer
				{
					pos = 0; // buffer position reset for next reading

					// extract data from serial buffer to 8 bit integer value
					// convert data from ASCII to decimal
                    read1 = ((sbuffer[1]-'0')*100) + ((sbuffer[2]-'0')*10) +(sbuffer[3]-'0');
                    read2 = ((sbuffer[6]-'0')*100) + ((sbuffer[7]-'0')*10) +(sbuffer[8]-'0');
                    read3 = ((sbuffer[11]-'0')*100) + ((sbuffer[12]-'0')*10) +(sbuffer[13]-'0');

					// Do whatever you wish to do with this sensor integer variables
					// Show on LCD or Do some action as per your application
					// Value of variables will be between 0-255

				} else { //store serial data to buffer
					sbuffer[pos] = ch;
					pos++;
				}
	   } // end while
}// end main
Watch video of testing on youtube.
Arduino Code
//Code for Arduino by Sugad Anandrao Mankar & Jurs
//Just Connect Tx pin to Arduino Rx 0 pin  and run below code
// Demo program for Arduino MEGA2560 board and sensor with serial output
char sbuffer[30], ch;
unsigned char pos;
unsigned char read1, read2, read3;

void setup(){
 Serial.begin(9600); // Serial is used for output on PCs "Serial Monitor"
 //Serial1.begin(9600); // Serial1 is used for serial input from connected sensor
}

char mygetchar(void)
{ //receive serial character from sensor (blocking while nothing received)
 while (!Serial.available());
 return Serial.read();
}


void loop()
{
 ch = mygetchar(); //loop till character received
 if(ch==0x0A) // if received character is , 0x0A, 10 then process buffer
 {
     pos = 0; // buffer position reset for next reading

     // extract data from serial buffer to 8 bit integer value
     // convert data from ASCII to decimal
     read1 = ((sbuffer[1]-'0')*100) + ((sbuffer[2]-'0')*10) +(sbuffer[3]-'0');
     read2 = ((sbuffer[6]-'0')*100) + ((sbuffer[7]-'0')*10) +(sbuffer[8]-'0');
     read3 = ((sbuffer[11]-'0')*100) + ((sbuffer[12]-'0')*10) +(sbuffer[13]-'0');

     // Do whatever you wish to do with this sensor integer variables
     // Show on LCD or Do some action as per your application
     // Value of variables will be between 0-255

     // example: send demo output to serial monitor on "Serial"
     Serial.print(read1);
     Serial.print('\t');
     Serial.print(read2);
     Serial.print('\t');
     Serial.print(read3);
     Serial.print('\t');
     Serial.println();
 } else { //store serial data to buffer
     sbuffer[pos] = ch;
     pos++;
 }
}// end loop